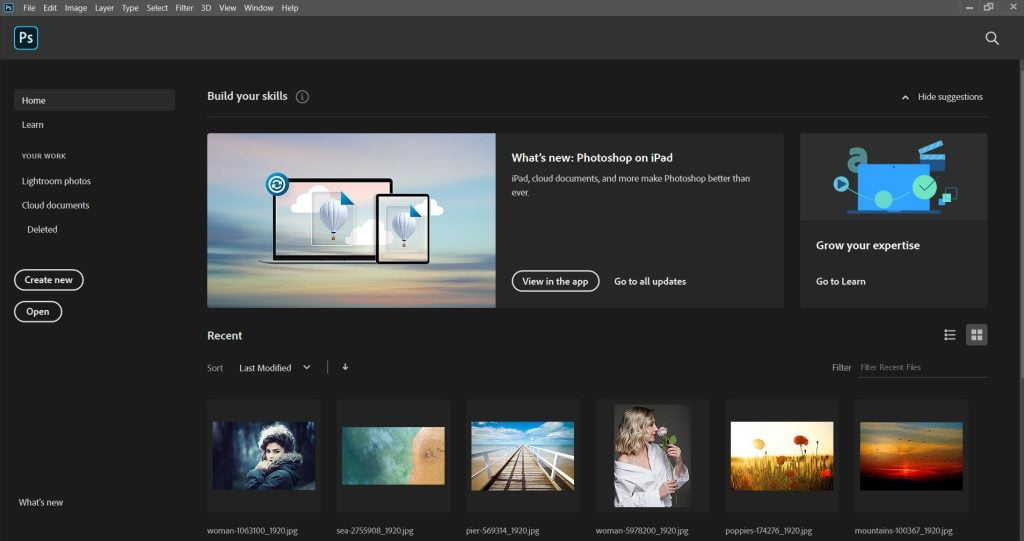
So, when you open Photoshop on your desktop, then the first thing you will see is the Photoshop home screen. Today, I will first tell you how to use the home screen in Photoshop. On the left sidebar of the Photoshop home screen, we find options such as ‘Learn,’ ‘Lightroom,’ ‘Cloud Document,’ ‘Create New Document,’ etc.
In this, you will see the ‘View’ option in the app in the center, and below, we will see the ‘Recently Opened File’ option. You can also change the display style formatting as desired, such as list format and thumbnails. Right now, I am working on the Photoshop CC version.

If you want to use Photoshop, I recommend downloading it directly from Adobe’s official website. Here, you can start with a trial version to evaluate whether the software meets your needs before opting for a purchase.
You need to beware of fraudulent websites that claim to provide free lifetime licenses or pre-activated copies of Photoshop. These websites often host malicious files that can compromise the security of your computer or account.
On the official website of Adobe, you will find clean software that is regularly updated, and remember to ensure your digital security. It is wise to use only legitimate sources.
Learn Photoshop
The second option is ‘Learn,’ where Adobe provides special tutorials for learning Photoshop. These tutorials will be helpful to you as a beginner, and they are available for free. If you want to learn Photoshop online at no cost, here’s some good news: you can check our course guide and learn Photoshop online, from beginner to advanced levels, for free.

HOW TO TURN ON AND OFF THE HOME SCREEN IN PHOTOSHOP?
If you are a Mac user, then you have to work according to the below-given method to disable and enable the home screen in Photoshop.
Go to Photoshop CC > Preferences > General > Disable the home screen.
Restart photoshop.
And for PC users: File > Preferences > General > Disable the home screen. Done.
Lightroom Photos
On the left sidebar of the home screen, you will find the option for Lightroom CC.
Lightroom CC enables you to upload your images to the cloud, allowing you to access the images you’ve uploaded directly in Photoshop through this part of the interface. I upload some images to the cloud and then select a few of the photos I uploaded to open in Photoshop. Now, I need to click on the ‘Import Selected’ button to open them.
HOW TO OPEN AND CREATE A NEW FILE IN PHOTOSHOP?
In Photoshop, you can create a new work file by clicking the ‘Create New’ option on the home screen. Alternatively, you can use the shortcut key (Ctrl+N).
Another way to create a new Photoshop file is to go to the File menu and click ‘New.’ A pop-up window will appear, allowing you to create your new document by selecting from the document presets according to your needs. This is the easiest way to navigate the Photoshop home screen. I hope you found this tutorial helpful.
Open Document
If you want to open a file that you haven’t opened recently, you can click the “Open” button on the screen and then select “File > Open” to open the image.
Navigate to the folder containing the image to open it. To return to the home screen, click on the home icon above; this allows you to open it again from the recent images.
Another effective way to access files or open images is with keyboard shortcuts: (CTRL + O) for PC users and (Command + O) for Mac users.
Summing Up: Navigating the Home Screen in Photoshop
In short, Photoshop’s home screen is an essential tool for optimizing your editing workflow, providing rapid access to recent files and critical functions.
For newcomers, grasping the fundamentals is critical, and mastering the home screen is an excellent place to start. Your next step is to become familiar with the Photoshop interface in our upcoming tutorial.
We would love to hear your comments and experiences using Photoshop’s home screen! Please leave your thoughts below, and remember that mastering Photoshop is just one tutorial away. Stay tuned!


